Second Serial Port to Read and Write to Rfcomm0
ESP32 Devlog six — Bluetooth and ESP32
"Connect to ESP32 using Bluetooth from linux organisation is not recommended" — they said. And they were right if you're trying on the linux reckoner.

Android users rejoice, you lot tin can merely apply the Serial Bluetooth Final app. Install the android app and use that thing right away. I recommend yous to read the tutorial from Random Nerd Tutorials about connecting the ESP32 bluetooth to your android concluding.
DISCLAIMER: This devlog is very clunky, if you happen to successfully connect your ESP32 with the Ubuntu-based calculator, or perchance Linux system, then congratulations. If you haven't connected yet, happy troubleshooting. Besides, y'all may notice that my writing style for this specific devlog is full of ranting and swearing. Proficient luck.
THE HARDSHIPS:
- I cannot connect to the ESP32 Bluetooth module using Graphical User Interface (GUI) from gnome on Ubuntu 19.x, then i should do the connexion in last a.m.a. THE HARD WAY
- The concluding itself also won't connect to the ESP32 at first. It was infuriating knowing piffling time i have to fully commit on this projection.
- Make Sure You lot ALWAYS Ready YOUR ESP32 BLUETOOTH MODULE MAC ADDRESS ON CLIPBOARD, using nano may help or only copy the address into other text editor.
- Y'all cannot open the series monitor and screen command at the same time.
A. Requirements
As a ubuntu user, you may or may not connect the ESP32 like bread and butter. You should install several packages i have constitute useful for this project across the community forums.
Packages
- bluetooth, blues, bluez-tools, bluez-utils: Maybe for bluetoothctl and other bluetooth shenanigans. Anyways i just install those packages hoping that this project would piece of work.
- rfkill: Just some other organisation process killer for killing rfcomm
- blueman: GUI for bluetooth connection manager. I recommend this package if y'all're feeling lucky to connect the ESP32 bluetooth module in a graphical sense. But in this devlog, i won't use this. It doesn't solve the
- screen: A very powerful tool for series communication monitor on this project. You lot may utilise Arduino IDE Serial Monitor, though you must establish bluetooth connection your ESP32 to your computer.
sudo apt-become install bluetooth bluez bluez-tools bluez-utils rfkill blueman screen Environment Setting
The ESP32 is almost probable attached to user group "dialout". For Ubuntu users similar me, add your user to the dialout grouping so yous have appropriate permissions on the device and no errors related to permission going to popular in your face. If information technology nonetheless slaps an fault: reboot information technology, accept a suspension, then proceed the project.
          sudo usermod -a -Grand dialout $USER
sudo reboot
Hardwares
- ESP32-WROOM
- Your typical telephone charger, not type C, it is male MicroUSB to male USB cable
- BMP180 or similiar
- 8 male to female jumper cables
Others (Alarm, This is VERY optional)
- A liter of booze
- A pack of cigarettes
- 5 hours of time
- Loads of prayer and luck
- PATIENCE
B. Bluetooth Pairing — Legacy
This section is for legacy bluetooth connection. ESP32 comes with Bluetooth Legacy (BL) and Bluetooth Low Energy (BLE). The difference is that the legacy listens for connection every bit long as the device is powered up and the low energy only agile when a connection request is received.
The Lawmaking
Using the case bluetooth serial connection from Arduino IDE, compile the lawmaking and upload it to the ESP32. I tweaked the code so the sender and reciever serial monitor tin see the output message.
The Connection
This is the hardest office to achieve. I might not document all the errors i have because it'south too lengthy, not plenty time to wrap it all.
Stride i: pair the device
This step is straightforward. Open up upwardly your Ubuntu concluding. Then execute bluetoothctl command with super user privilege.
          $ sudo bluetoothctl
[bluetooth]# power on
[bluetooth]# agent on
[bluetooth]# scan on
[bluetooth]# pair 24:6F:28:17:second:4A
That control will direct you to bluetooth subshell environment (i made upwards that term). And then power information technology on and register the agent. Afterwards, scan the devices bachelor for bluetooth connection. You may see your device proper name with respective MAC Address. Pair the ESP32 by using the MAC Address and blazon yeah regardless the passkey.
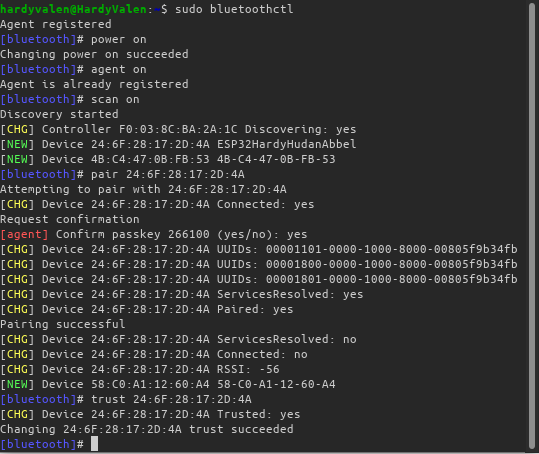
Subsequently you confirm the passkey, you may discover that the device is non continued yet. Information technology's not a problem because you don't need to connect on this subshell. Dare to connect the ESP32 on this subshell, you'll get slapped by this error:
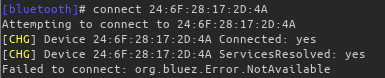
There'due south nothing to do in this subshell, so either CTRL + D, type quit on the final, or blazon assistance if yous want to seek further into this subshell.
Footstep 2: CONNECT the device
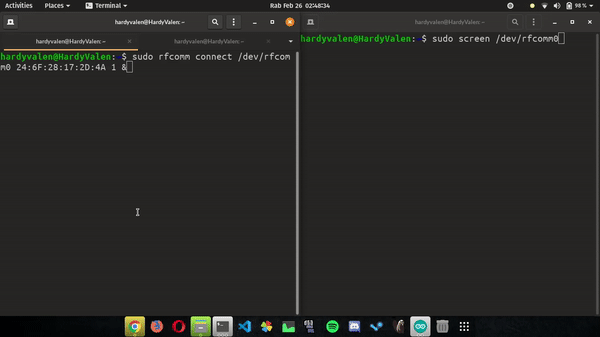
Simple, but hell if it's not working on your kickoff try. You lot just employ rfcomm command for this and don't paste my ESP32 MAC address . I guarantee information technology will non working if you lot use my MAC address:
sudo rfcomm connect /dev/rfcomm0 24:6F:28:17:2D:4A 1 & If you successfully connect to the ESP32, congratulations for escaping hell. You lot may await this output:

This is bodily hell, even though later i managed to connect to the device, my PTSD somehow crawls back. I got and so many slaps in this stride and i nearly broke downwardly. Only in the 2nd try to connect the ESP32, somehow it works. The possible errors:
- Can't connect RFCOMM socket: Host is down — Try use YOUR ESP32 MAC Address, non mine. I learned it in a hard style.
- Can't create RFCOMM TTY: Address already in use — try using these command:
          sudo killall rfcomm
sudo rfcomm release 0
sudo rfcomm demark 0 24:6F:28:17:2D:4A
If the control doesn't piece of work, probably yous opened the serial monitor on arduino IDE.
Pace iii: Try to communicate using read and write
This step might be as daunting every bit the previous one. You may have screen packet installed to your computer. Run the command below by opening another terminal tab
sudo screen /dev/rfcomm0 You lot may get another slap like
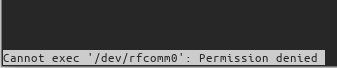
[screen is terminating] if y'all not running information technology every bit a root or having an appropriate permission to practice and so. To quit from screen, Press CTRL+A, and so type :quit like a vim text editor user (though, i call up the control as :q on vim).
You lot may encounter the permission denied error message when you want to use bluetooth connection. You lot should reboot your calculator to fix this fifty-fifty you apply the adduser to dialout grouping permission.
So, run the stty control. You can run into the flag and other descriptions on this on this documentation. Here, i am using the 115200 baud rate. You lot tin can alter the baud rate past uploading the .ino file to the Arduino IDE and practise the connection thing all over again.
sudo stty -F /dev/rfcomm0 cs8 115200 ignbrk -brkint -icrnl -imaxbel -opost -onlcr -isig -icanon -iexten -echo -echoe -echok -echoctl -echoke noflsh -ixon -crtscts And, information technology'due south non actually working for my case, even though you use the aforementioned baud rate from the code. I suppose this is the run a risk to footstep back and use the serial monitor provided past Arduino IDE.
Stride 4: The Letdown
Okay, i learned the hard way that the Arduino IDE series monitor might using the aforementioned way that i apply to institute bluetooth connection with ESP32. My laptop and ESP32 is continued. As before long as the series monitor started, the connection went off and information technology persists to the serial monitor.
What a letdown
Okay, this infuriates me of course. I should install the serial bluetooth terminal to tweak the bluetooth connection. I cannot even impress hello earth from the screen. Perchance i should try some other mode similar using the loop to continuously prints the message and i'm going to watch it from my linux system.
C. Bluetooth Legacy, Revisited
Okay, lesson learned. I won't use the serial monitor and screen at the same time. At present, i'm going to exclusively use the screen command. Using the modified code, i wanted to print a bulletin to my ESP32 and in plough the ESP32 showed me the upshot in my terminal. So, i tweaked the code a trivial bit
Then, i try to connect the ESP32 bluetooth using the rfcomm connect, open the bluetooth serial using screen, and write a how-do-you-do world message using stty and repeat to /dev/rfcomm0
sudo su -c "echo 'Hello LCD' > /dev/rfcomm0" If you get a permission denied error, you may use this command as an alternative of the control above
sudo echo Hello World > /dev/rfcomm0 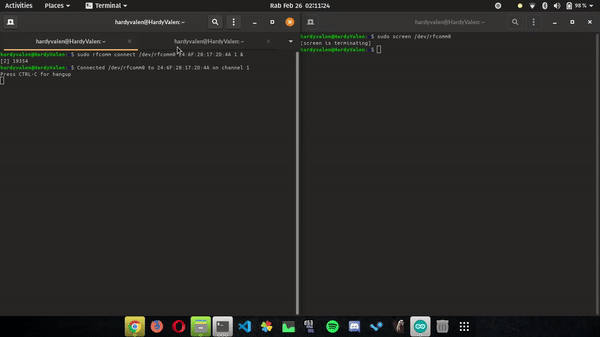
D. The quest continues: Using BMP180 Module
Now, i'm going to print the BMP180 Temperature reading to the terminal, which connected using bluetooth to the ESP32. I've fabricated the vanilla post which prints the output on the serial monitor. At present, things get a little dissimilar. Using the same wiring schema and different code i'm going to write the temperature to the bluetooth serial monitor on ubuntu concluding.
East. Next Blog
Okay, this devlog at last going off the course. I usually refer to Random Nerd Tutorial. But this time, i could finally try my own project like using the Gnome Terminal on Ubuntu rather than using the mainstream way of using android serial bluetooth concluding app. It's hard to go out from the box and trying the other method to testify the bluetooth series final.
I've learned and so much at a price of my time to practice another load. I have so much to do yet and then little fourth dimension for this calendar week. For the adjacent mail, i'm going to display the bluetooth serial to I2C LCD.
Next Web log: Devlog 7 — LCD And Bluetooth
Source: https://medium.com/@18218004/devlog-6-bluetooth-and-esp32-ba076a8e207d
0 Response to "Second Serial Port to Read and Write to Rfcomm0"
Post a Comment